
TLDR; Get your Docker Cheat Sheet as PDF or as an image. To follow this article, make sure your development machine has Docker installed. In this blog post, we write our own Dockerfiles, learn how to create images, and finally run them as container. The complete source code is available on GitHub.
Table of Contents
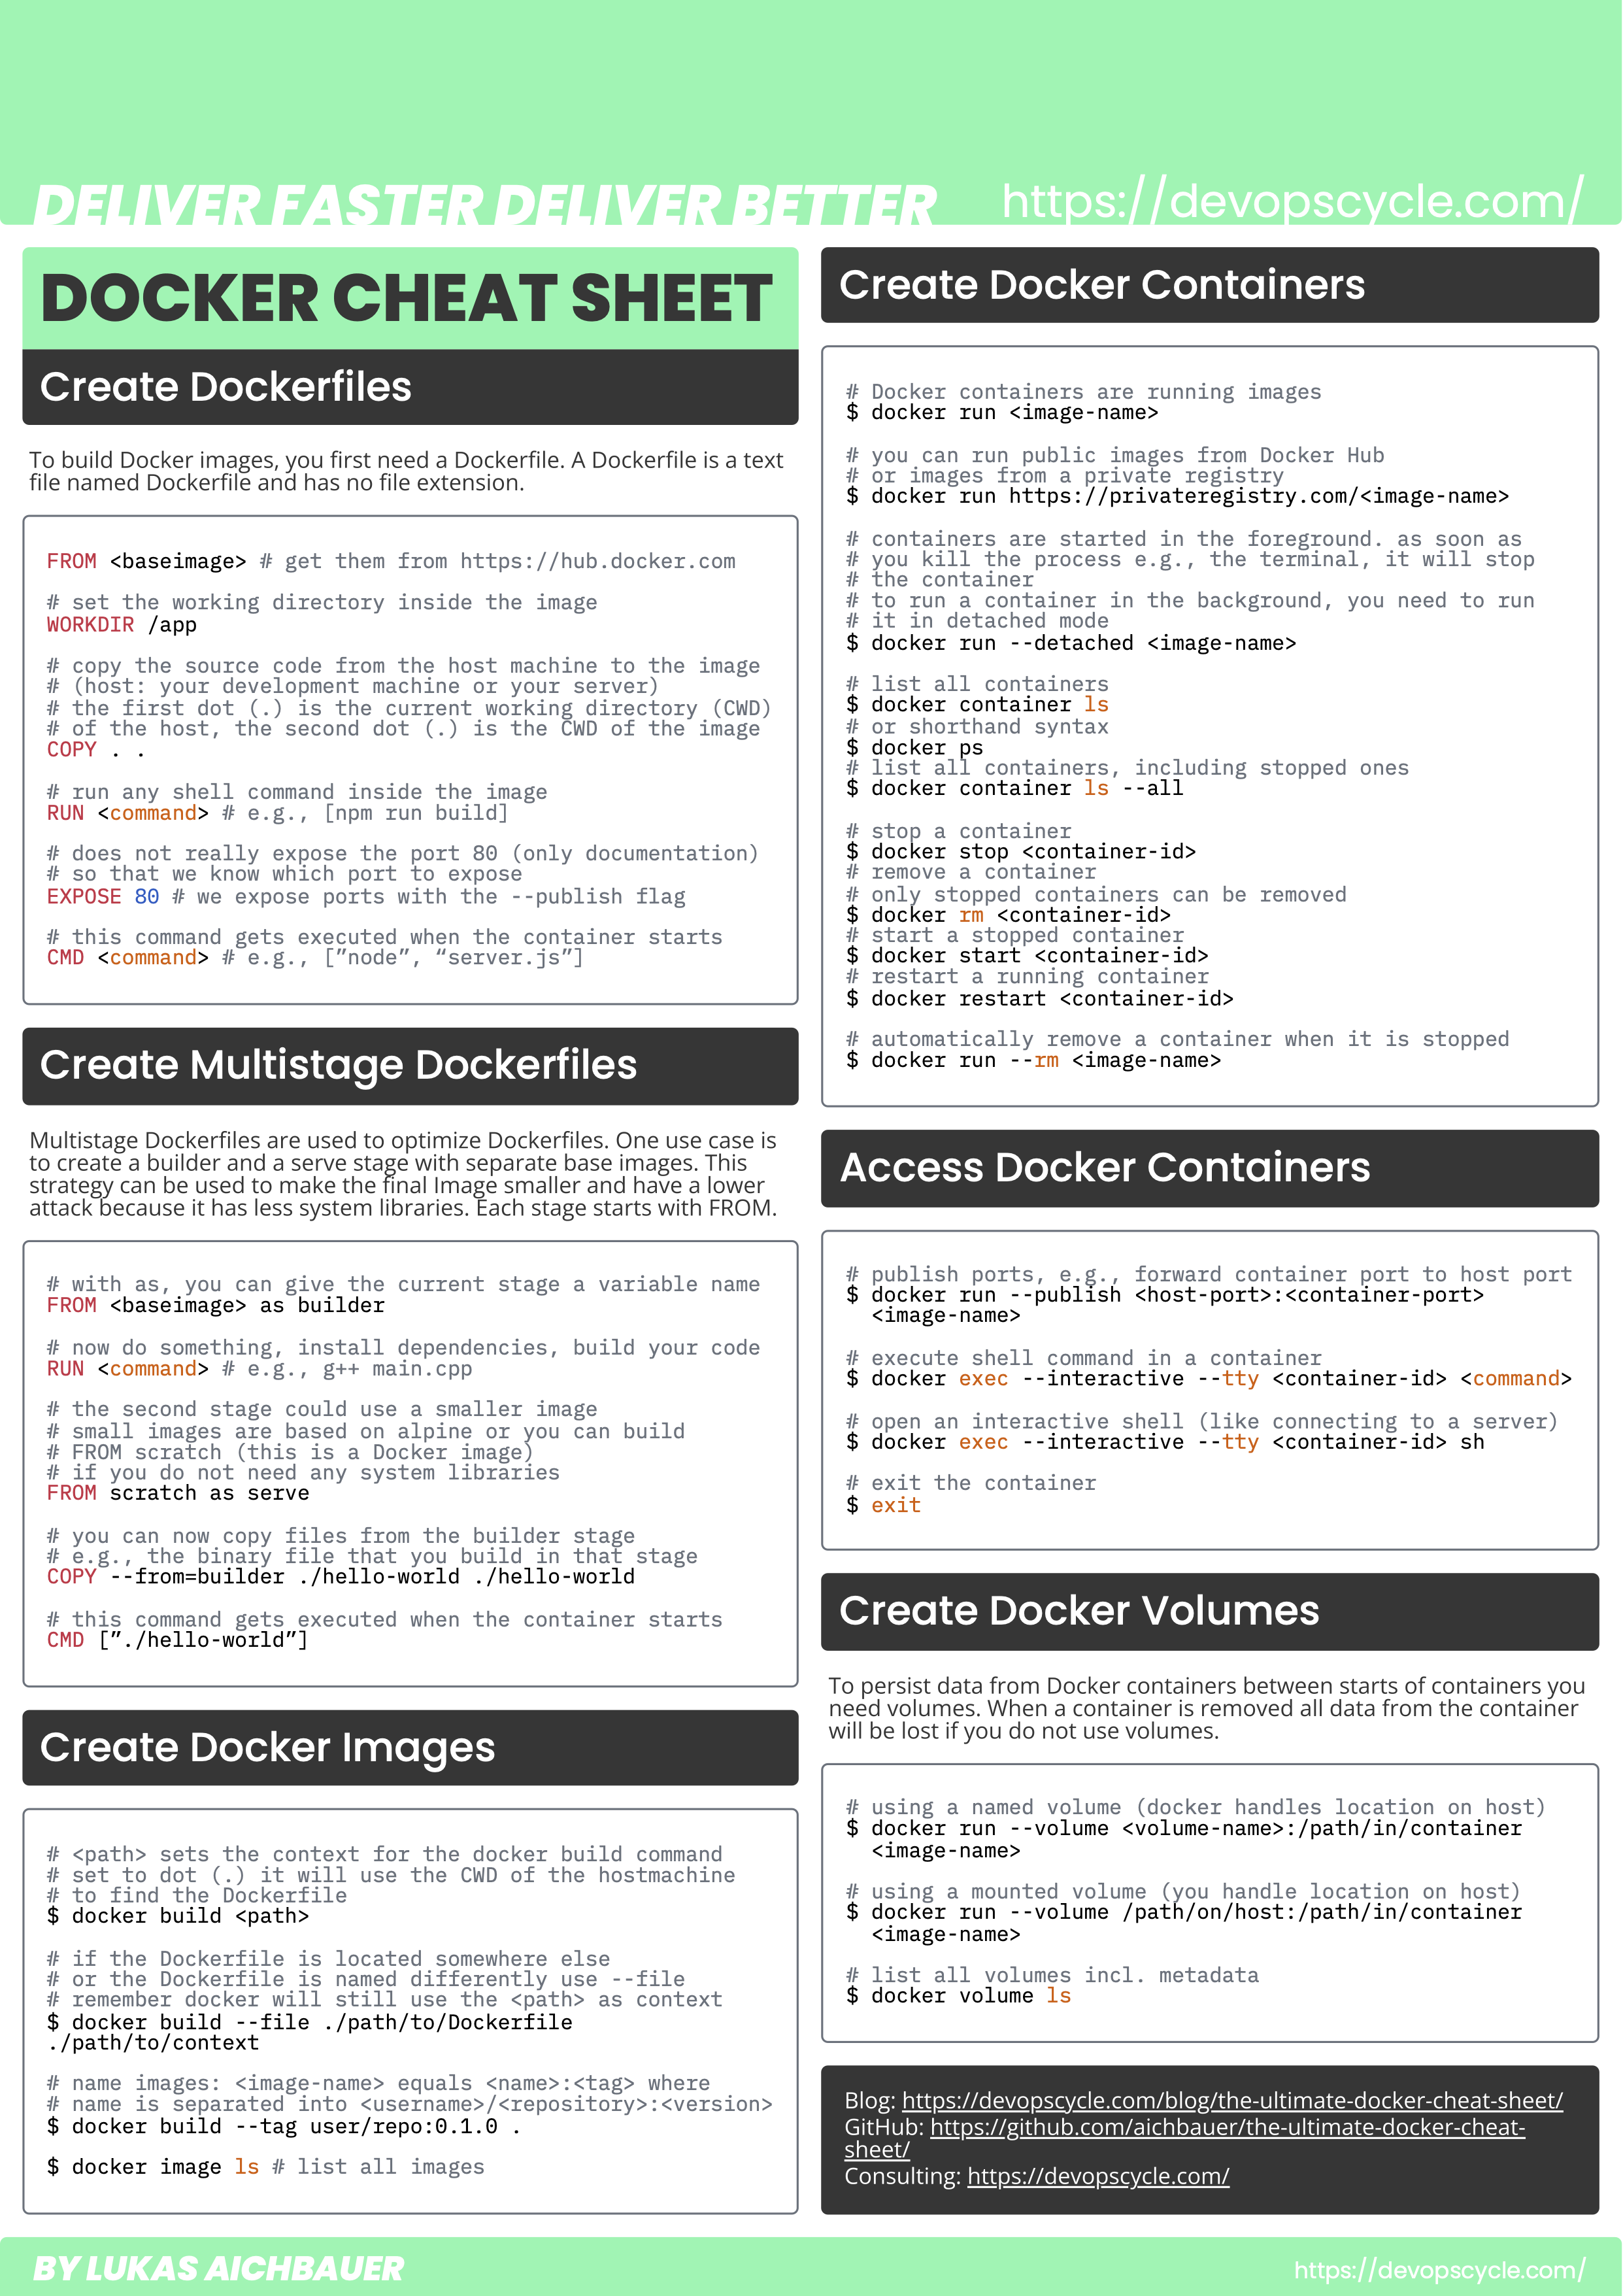
Download The Ultimate Docker Cheat Sheet
Please download your Docker Cheat Sheet to follow along with this article. You are also welcome to share it with your colleagues and friends.
Do You Want More Resources Like This?
Join our community and sign up for our newsletter to stay up-to-date on the latest DevOps topics. Get access to our newest resources and insights directly in your inbox!
What Is The Difference Between A Dockerfile, An Image And A Container?
All these things build on top of each other. You need a Dockerfile to create an image, and you need an Image to create a Container.
- Dockerfile: The first step in using Docker is writing a Dockerfile. It is an essential blueprint for constructing Docker images. It is a text file, is usually named "Dockerfile" without any extension, and contains a series of instructions. Each line in this file represents a new instruction, forming a stack of layers. Each layer is cache-able. When you build an image twice, it will use the cache. When you change a line in the file, it rebuilds all instructions after and including the change.
- Image: Building a Dockerfile outputs a Docker image. You can think of an image like an executable. Just like clicking an icon (executable) on your desktop to launch an application. You can start an image to launch a container. The Docker image encapsulates your application code and all its dependencies. This includes the runtime and system libraries. It is a self-contained unit that ensures consistency and portability across various environments. For example, your development machine and your production server.
- Container: This is a dynamic, running instance of a Docker image. An executed image spawns a container with the command in the Dockerfile. Important to note: one image can give life to many containers. If Linux is your operating system, the Docker container will run as a process on the host machine. If you have a Windows or macOS machine, docker will run in a virtual machine (VM). The container will use the same kernel, either the kernel of Linux or the VM on Windows or macOS. The container itself is not a virtual machine. The container cannot see other processes of the host and has its own file system. This is why it seems as it is a virtual machine. But in reality, it shares the kernel of the host machine (or the kernel of the VM).
In conclusion: the Dockerfile is the base for an image, and an image is used to create a container. A container is running as a process on the host machine. Yet, it has its own file system and is separated from the other processes.
How Do You Create A Dockerfile?
To generate a Dockerfile, you can create a plain text file. This article will use the command line for it:
# create a new file in your current working directory called Dockerfile
$ touch Dockerfile
# open the file in your favorite editor (we are using Visual Studio Code)
# if you do not have the code command installed, you will need to open it manually
$ code Dockerfile
A Dockerfile holds all the instructions to build, start and run your application. Every command that you otherwise need to execute manually is written in a single file. It starts by using a base image. This is usually a small Linux distribution like alpine. If you have to execute a binary, you should use FROM scratch. This article uses a Fastify server, so it uses an alpine image configured for Node.js. You can view the complete code on GitHub. If you are interested in how you should choose base images, you can read our article: "How Do You Choose A Docker Base Image".
Now we will edit the Dockerfile in Visual Studio Code:
# the next line sets the base image for this image
# the base image is also based on a Dockerfile
# see: https://hub.docker.com/layers/library/node/18-alpine/images/sha256-a0b787b0d53feacfa6d606fb555e0dbfebab30573277f1fe25148b05b66fa097
# node provides official images for Node.js and
# alpine: a lightweight Linux distribution to reduce image size
FROM node:18-alpine

# sets the working directory inside the image
# all commands after this instruction will be
# executed inside this directory
WORKDIR /app

# copies the package.json and package-lock.json
# from the client (e.g., your server or your development machine)
# into the /app directory inside the image
# before running npm ci to
# get the advantage of layer caching
COPY ./package* .

# installs all node.js dependencies
# npm ci is similar to npm install but intended to be
# used in continuous integration (CI) environments
# it will do a clean installion based on the package-lock.json
RUN npm ci

# copies the source code into the image
COPY . .

# this runs the build command specified in the package.json
RUN npm run build:server

# the EXPOSE instruction does not actually expose the port 300 of this image
# this is documentation so that we know which port we need to expose
# we do this when starting the container with the --publish flag
EXPOSE 3000

# executes the server.js file that is located in the build directory
CMD ["node", "./build/index.js"]
What Is A Multistage Dockerfile?
You can compose a Dockerfile with many stages. You can think of one stage, as one image. Furthermore, you can then use materials like files from one stage in another stage. A new stage always starts with the line FROM <base-image>. If you are interested in how you should choose base images, you can read our article: "How Do You Choose A Docker Base Image". You name a stage using the as keyword. This article uses a simple HTML and JavaScript file as our client application. As a web server, we will use NGINX. You can view the complete code on GitHub.
A typical approach is to have a builder stage, with a larger base image. This image holds all executables and libraries needed to build your source code.
The second stage is the serve stage and has a small base image. The benefit is fewer dependencies and libraries. Just enough to execute and serve your application.
With this approach, you make your final image both smaller and more secure. As the image size decreases and the image consists of fewer libraries. Fewer system libraries means it has a lower attack surface. Multistage Dockerfiles are not limited to this use case and can have more than two stages as well.
# lets create a new Dockerfile for our frontend application
# as we can specify a file in the build command, we name this Dockerfile.client
$ touch Dockerfile.client
# open the file in your favorite editor (we are using Visual Studio Code)
# if you do not have the code command installed, you will need to open it
$ code Dockerfile.client
Here is an example of a multistage app:
# the base image
# name it builder
# you can reference this stage
# in other stages by this name
FROM node:18-alpine as builder

# working directory inside the image
WORKDIR /app

# copies files from the client to the image
COPY ./package* .

# run a command inside the image
RUN npm ci

# copies files from the client to the image
COPY . .

# run a command inside the container
# this will create a new folder in called dist in our app directory
# inside the dist directory, you will find the
# final HTML and JavaScript file
RUN npm run build:client

# serve stage
# slim nginx base image named as serve
# will start nginx as non root user
FROM nginxinc/nginx-unprivileged:1.24 as serve

# we can now copy things from the first stage to the second
# we copy the build output to the directory where nginx serves files
COPY --from=builder /app/dist /var/www

# we overwrite the default config with our own
# if you take a look at the GitHub repository, you
# see the .nginx directory with the nginx.conf
# here we only use the port 80
# in production, you would also want to make sure
# all requests, even in your internal network or Kubernetes cluster
# is served via HTTPS when dealing with sensible data
COPY --from=builder /app/.nginx/nginx.conf /etc/nginx/conf.d/default.conf

# the EXPOSE instruction does not actually expose the port 80 of this image
# this is documentation so that we know which port we need to expose
# we do this when starting the container with the --publish flag
EXPOSE 80

# The command used when the image is started as a container
# Note: for Docker containers (or for debugging),
# the "daemon off;" directive which is used in this example
# tells nginx to stay in the foreground.
# for containers, this is useful.
# best practice: one container = one process.
# one server (container) has only one service.
CMD ["nginx", "-g", "daemon off;"]
How Do You Create A Docker Image?
We use the Docker CLI to build images out of our Dockerfiles.
# list the directory to make sure you are in the directory with the Dockerfile
$ ls
# if not, change the directory with "cd ./path/to/directory-with-Dockerfile"
# build an Image out of the Dockerfile in the current working directory
$ docker build .
# if you want to build another Dockerfile in this directory, use the --file flag
# e.g., --file <filename>
$ docker build --file Dockerfile.client .
Creating an image from a Dockerfile only requires the docker build command. Without specifying a name and tag, you can reference the image only by its image ID.
How Do You List All Images?
# list all local images on the client (your server or your development machine)
$ docker image ls
# find your image ID
If you want to give your image a name, you need to use the --tag (shorthand syntax: -t) flag while building the image. You will need this if you are working with a registry like Docker Hub.
How Do You Name Your Images?
To name and tag your image, use the following pattern: <name>:<tag>. This is usually translated into <username>/<repository>:<version>. The username corresponds to the username of the registry.
# build and tag your image
# a tag consists of a name and a tag, which is separated by a colon (:)
$ docker build --tag examplename/examplerepository-server:0.1.0 .
# or
$ docker build --file Dockerfile.client --tag examplename/examplerepository-client:0.1.0 .
# list all local images
$ docker image ls
# you will see your image with a proper repository name and a tag
How Do You Create A Container?
A container is a running image. You can run images with the CLI command docker run <image-name>:
# start our image
$ docker run examplename/examplerepository-server:0.1.0
# or
$ docker run examplename/examplerepository-client:0.1.0
Every Docker installation comes with a local registry. Docker stores your images here. First, the docker run command will look at the local registry and try to find the image. This will happen with our image, since we built it on the same machine we are executing the docker run command. If it does not find the image locally, it will take a look at the Docker Hub registry. You can also get images from other registries (e.g., your self-hosted registry). For that, you can use the URL of the self-hosted registry.
# try to find an image on another registry
$ docker run https://registrydomain.com/examplename/examplerepository-server:0.1.0
If you run an image, it starts in a foreground process. The container is running as a process in the terminal where you executed the docker run command. If you kill the terminal, it will stop the container immediately. To let your container run on your machine or server, you can run the container as a background process. In that way, you can close your terminal with no worries.
How Do You Run Containers In The Background?
The --detached (shorthand syntax: -d) flag will start containers in a background process:
# run container in the background
$ docker run --detached examplename/examplerepository-server:0.1.0
# or
$ docker run --detached examplename/examplerepository-client:0.1.0
You will see that the command will exit, and you can use the terminal again.
How Do You List All Containers?
Docker will only show the running containers.
# list all running containers
$ docker container ls
# short
$ docker ps
If you want to see all containers, even the stopped containers, you need to pass the flag --all (shorthand syntax: -a).
# list all stopped and running containers
$ docker container ls --all
How Do You Stop And Remove Containers?
Occasionally, you would like to stop containers. When you stop containers, they are still on the system, you can start them again. If you wish to clean the container from the system, you will need to remove it. You can only remove a stopped container.
# stop a container
$ container stop <container-id>
# start a container
$ container start <container-id>
# restart container
$ container restart <container-id>
# remove a stopped container
$ container rm <container-id>
If you wish to remove a container as soon as you stop it, you can pass the --rm flag when starting a container. Only use this if your container is stateless. If your container has its own state, make sure to use volumes to preserve it. Otherwise, all your data inside the container is lost when your container stops.
# automatically remove a container after it stops
$ docker run --rm examplename/examplerepository-server:0.1.0
# or
$ docker run --rm examplename/examplerepository-client:0.1.0
What If I Killed The Terminal, But The Container Is Still Running?
Sometimes signals are not passed to the container properly. Imagine you have killed your terminal because you could not stop the container with CTRL+C. But If you try to restart the container, it tells you that the port is already allocated. This means your old container is still running. To kill a container, run the following command:
# kill a container
$ docker kill <conatiner-id>
How Do You Access Containers From The Host System?
Usually, a Docker container exposes one or many ports. You can access the application which is running inside the container via those ports. To have access to these ports, you need to publish those port during the container creation. Another way to access containers from the host system is by executing commands inside them. This is often used for debugging or single use container application.
How Do You Publish Ports?
To expose the ports to the host system, you need to add the --publish (shorthand syntax: -p) flag.
# publish ports, e.g., forward container port to a port on the host system
$ docker run --publish 3000:3000 examplename/examplerepository-server:0.1.0
# or
$ docker run --publish 80:80 examplename/examplerepository-server:0.1.0
# if you run both containers, the server and the client
# and you visit the localhost:80 in your browser
# you should see the message Hello World
In the first example above, we bind the port 3000 from the container to the port 3000 on the host system. The host system is your development machine or your server. The format is the following --publish <hostport>:<containerport>.
How Do You Access A Running Container?
Sometimes, you want access to a container. This can be beneficial for debugging.
# access the container
$ docker exec --interactive --tty <container-id> <shell-command>
--interactive --tty (shorthand syntax -it) instructs Docker to allocate a pseudo-TTY connection. In this way, the containers’ stdin (standard input) creates an interactive shell in the container.
You can execute any command that would be possible within the container. If you have a Debian container running, you would be able to list the directory:
# list the directory inside the container
$ docker exec --interactive --tty <container-id> ls
You can even create a secure shell like connection with the following command:
# SSH into the container (if the `sh` command exists in the container)
$ docker exec --interactive --tty <container-id> sh
# this will keep the connection to the container open
# and you can execute multiple commands within the container
# to exit the container, run the following
$ exit
How Do You Persist Data With Docker Volumes?
Data that is stored inside a container is not persisted by default. When you stop and remove a container, all data from this container is lost. In our application, if you click the button on the website (http://localhost:80) we will write "New message" into a JSON file inside the container. Now if we stop and remove the container, all those messages are deleted as well.
If you want to persist data between container starts, you need to use volumes. There are two different volume types: named volumes and mounted volumes. Named volumes are completely handled by Docker, a mounted volume is managed by you. For a mounted volume, you need to specify the location on the host system where this data will be stored. We use the --volume (shorthand -v) in our run command.
# using a named volume
# everything within this path of the container will be stored
# in a volume named <volume-name>
$ docker run --volume <volume-name>:/path/in/container <image-name>

# using a mounted volume
# everything inside the path of the container will be stored
# in the path of the host
$ docker run --volume /path/on/host:/path/in/container <image-name>
For our application, we need to use the following command for the server container:
# create a volume called server-volume
# we store the content of /app/build/data within our container
# on our host machine (your dev machine or your server)
docker run --volume server-volume:/app/build/data --publish 3000:3000 examplename/examplerepository-server:0.1.0
How Do You List All Volumes?
You can get an overview of all volumes and their metadata by listing them.
# list all volumes
$ docker volume ls

# here you will see the location where Docker will store the named volumes
# on the host machine
Conclusion
In this article we learned the difference between a Dockerfile, an image and a container. You can now write your Dockerfiles to create images. Furthermore, you can start containers and access them from the host system. Additionally, you also learned how to persist data between container starts.
If you need help with your containerization, feel free to contact us, or join our new community for further questions and discussions (free cookies for the first 42 arrivals and only 6 left 😱)!
Join Our CommunityYou liked this article? Share it with your colleagues and friends.
Sign up for our newsletter!
Do not miss out on our latest tips, guides, and updates – sign up for our newsletter now! We promise to only send you the most relevant and useful information. Be part of our journey in exploring the world of Docker and beyond.
By clicking subscribe, you agree to the privacy policy. You can unsubscribe at any time by clicking the link in the footer of our emails.