
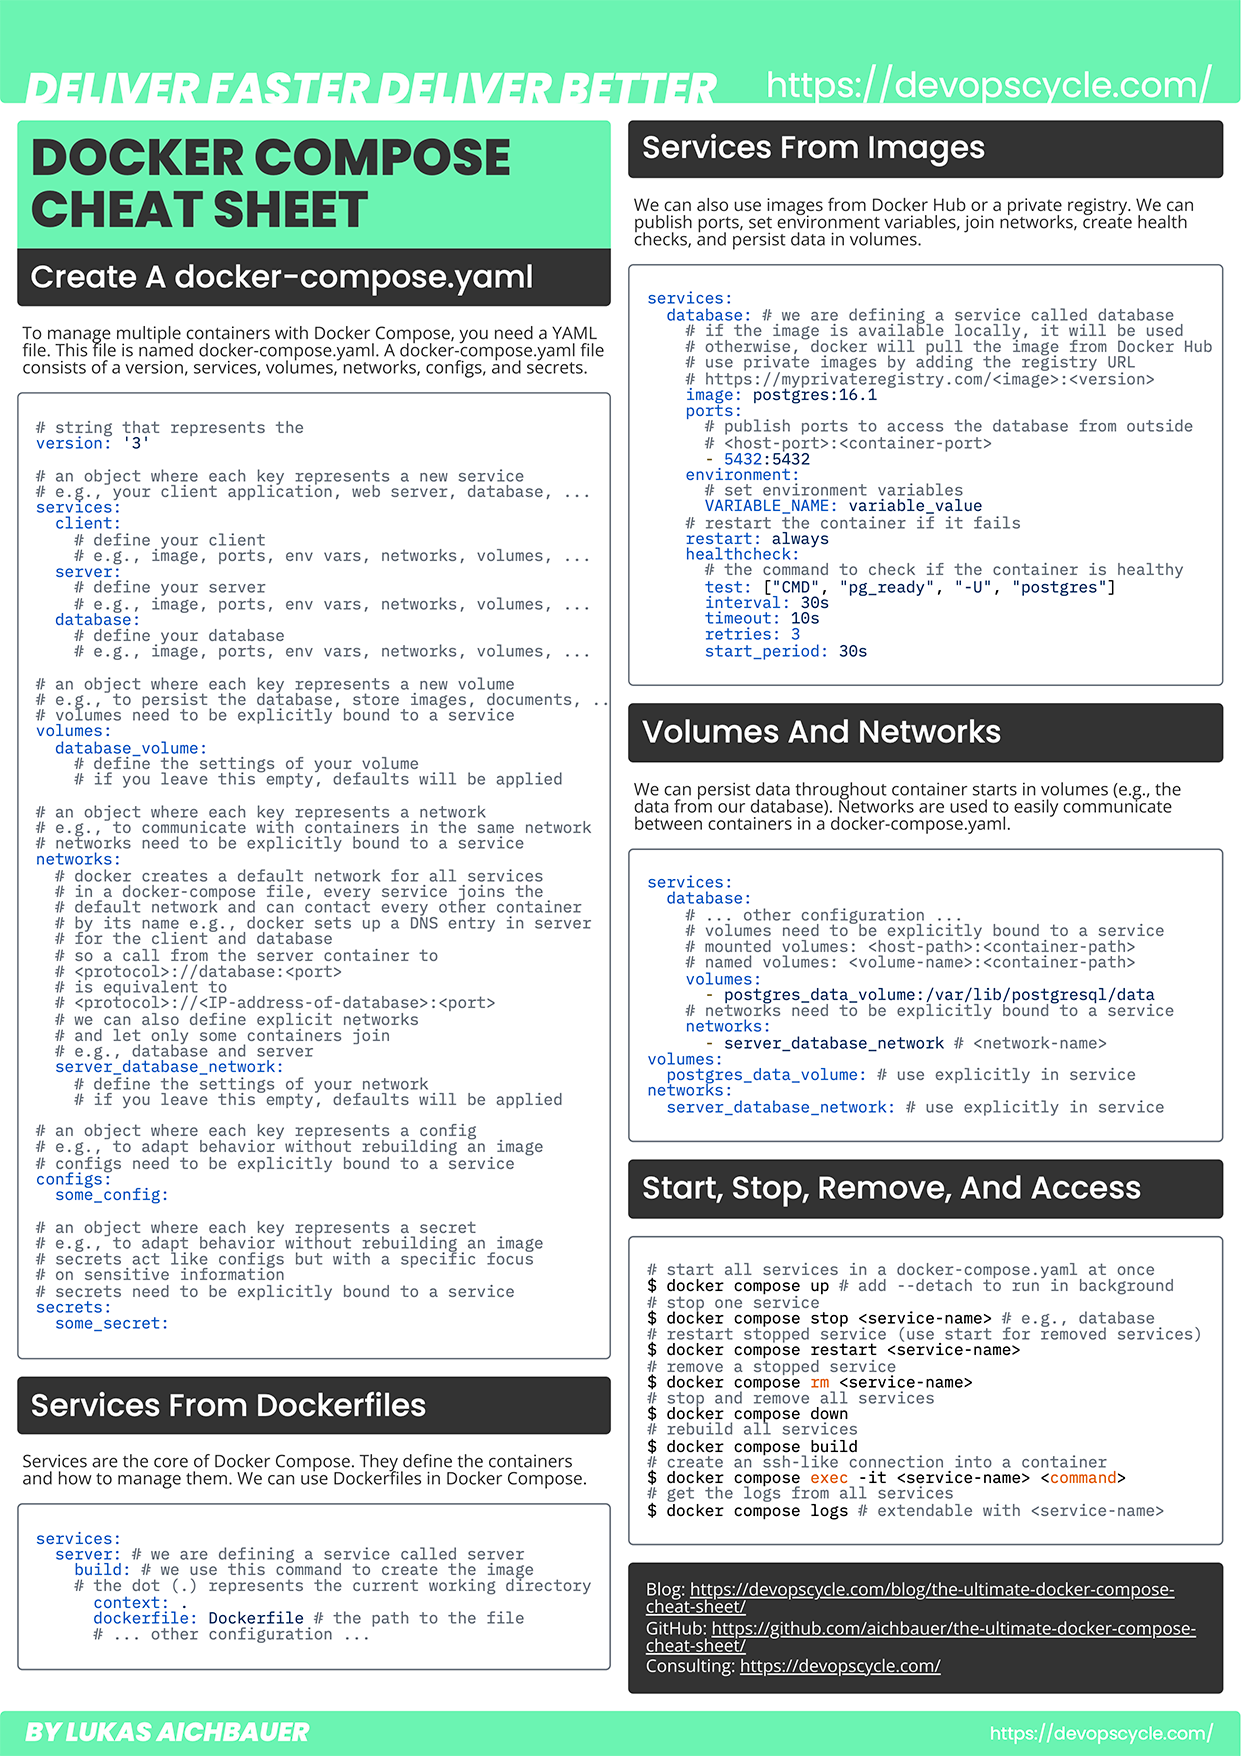
TLDR; Get your Docker Compose Cheat Sheet as PDF or as an image. To follow this article, make sure your development machine has Docker installed. In this blog post, we write our own compose.yml. We will also run multi-container Docker applications, and learn how to manage them. The complete source code is available on GitHub.
Table of Contents
Download The Ultimate Docker Compose Cheat Sheet
Please download your Docker Compose Cheat Sheet to follow along with this article. You are also welcome to share it with your colleagues and friends.
Do You Want More Resources Like This?
Join our community and sign up for our newsletter to stay up-to-date on the latest DevOps topics. Get access to our newest resources and insights directly in your inbox!
What Is Docker Compose?
"Docker Compose is a tool for defining and running multi-container Docker applications." It is used to configure and manage application services, networks, and volumes.
Compose uses text files and YAML as configuration language to manage multi-container applications. This tool simplifies the deployment and scaling of applications. It allows you to define a set of related Docker containers that can be controlled together.
What Is The Difference Between Docker and Docker Compose?
Docker is the tool that allows you to build images, start containers, create volumes, and networks. If you need help with Docker, read our blog "The Ultimate Docker Cheat Sheet" or watch our tutorials on YouTube.
Docker Compose is the tool that helps you to manage multiple containers. This includes building images, running containers. It will also help to set up volumes and networks for containers to communicate.
Docker Compose utilizes Docker to manage multiple containers. All with a single file and a single CLI command.
Why Do You Need Docker Compose?
Working with multiple containers at the same time can be complicated and complex. When you work with a single container, using Docker itself is just fine. But soon you will realize your application needs other services. For example, a database, an in-memory cache, a message queue, a storage bucket. I could go on with this list for a long time.
Managing all these containers with Docker alone would be complicated and difficult. You would need to manage each container on its own. This is where Docker Compose is beneficial. It simplifies the configuration and management of multiple containers.
What Is A compose.yaml?
This YAML file defines how Docker containers should operate in a multi-container setup. It is the foundation of Docker Compose. The single point for configuring and managing all components in a multi container setup. In this YAML file we define our services, volumes and networks.
What Is A Service In Docker Compose?
Services are containers that you would like to start. These containers are your applications. They vary from scripts, databases, web applications, web servers, and many more. In this article, we will use container and service interchangeably.
What Is A Volume In Docker Compose?
Volumes are used to persist data. These are directories that can be mounted onto containers. Volumes provide the same information (files) every time. Even when the container is removed.
What Is A Network In Docker Compose?
Networks are used for communication between containers. It enables isolated Docker containers to exchange information in a controlled and secure manner.
How Do You Write A compose.yaml?
We are creating a compose.yaml for an application that consists of two containers. A backend application and a web frontend. Throughout this article, we implement a third container. This container is a Postgres database, where we will persist our data. We will connect the Postgres container to a volume, to not lose our data, when we remove a container and start a new one. To enable our backend container to communicate with the Postgres container, we use a network. You will find the complete source code used in this article on GitHub.
# change directory to the root of our application
$ cd /path/to/the/application/root
# now we create an empty file called compose.yaml
$ touch compose.yaml
The compose.yaml has at its top level 6 main keywords. In this article will focus on only four of them: version, services, volumes, networks.
# string that represents the version of docker compose used
# for backwards compatibility and just informational
version: '3'

# an object where each key represents a new service
# e.g., your client application, web server, database, ...
services:
  client:
    # define your client
    # e.g., image, ports, environment variables, networks, volumes, ...
  server:
    # define your server
    # e.g., image, ports, environment variables, networks, volumes, ...
  database:
    # define your database
    # e.g., image, ports, environment variables, networks, volumes, ...

# an object where each key represents a new volume
# e.g., to persist the database, store images, documents, ...
# volumes need to be explicitly bound to a service
volumes:
  database_volume:
    # define the settings of your volume
    # if you leave this empty, default values will be applied

# an object where each key represents a network
# e.g., to communicate with containers in the same network
# networks need to be explicitly bound to a service
# docker creates a default network for all services in a compose file
# every service joins the default network and can contact every other container
# by its name e.g., docker sets up a DNS entry in server
# for the client and database
# so a call from the server container to <protocol>://database:<port>
# is equivalent to <protocol>://<ip-address-of-database>:<port>
networks:
  # we can also define explicit networks
  # and let only some containers join
  # e.g., database and server
  server_database_network:
    # define the settings of your network
    # if you leave this empty, default values will be applied

# an object where each key represents a config
# e.g., to adapt behavior without the need for rebuilding an image
# configs need to be explicitly bound to a service
configs:
  some_config:

# an object where each key represents a secret
# e.g., to adapt behavior without the need for rebuilding an image
# secrets act like configs but with a specific focus on sensitive information
# secrets need to be explicitly bound to a service
secrets:
  some_secret:
In the next sections we will learn how to configure and write services, volumes and networks. In the end, we will combine all of them to start our web application, our web server, and our database. We will connect the server and the database through a network so that we can communicate with our database. The data of the database will be persisted in a volume, that we can delete the container and start the container with the same information again.
How Do You Start A Service From A Dockerfile?
You can start a container in Docker Compose from a Dockerfile. Docker Compose will build the Container and then start the image.
version: '3'

# all the services that we are defining
# services are running containers
services:
  # we are defining a service called client
  # this is the client side of our application
  client:
    # we use the build command to create the image
    # from the Dockerfile that we pass to this command
    # in this case "Dockerfile.client"
    # this image will then be used to create the container
    # we also pass the context of the build
    # as the compose.yml file is in the same directory
    # as the source code, we can use the .
    # to refer to the current directory
    build:
      context: .
      dockerfile: Dockerfile.client
How Do You Start A Service From An Image?
You can also start a container from an already built image. If the image is not found locally by Docker, it will try to pull it from Docker Hub. In our case, we will pull the Postgres image version 16.1 from Docker Hub.
version: '3'

# all the services that we are defining
# services are running containers
services:
  # we are defining a service called database
  # this is the Postgres database of our application
  database:
    # this time we do not use the build command
    # we use the image command to use an existing image
    # by default, docker compose will look at the local registry
    # to find the image
    # if it is not available locally, it will pull it from
    # the docker hub registry
    image: postgres:16.1
How Do You Publish Ports With Docker Compose?
If you want to publish ports, to access the containers from the host system, we can add the ports to the service object. We want the client to be accessible from our host system. We intend to visit http://localhost:80 in our browser to see our web application.
version: '3'

services:

  client:
    build:
      context: .
      dockerfile: Dockerfile.client
    # the ports that we want to publish
    # the first port is the port on the host system
    # the second port is the port inside the container
    # so we map the port 80 of the container to the
    # port 80 of the host
		# ports is an array, so you can add as many ports as needed
    ports:
      - "80:80"
How Do You Handle Environment Variables In Docker Compose?
For some applications, it is necessary to pass environment variables. For example, passwords, domains, ports, IP addresses, API keys. You can pass them as an object to the key environment or as a path to the file where you store them to the key env_file.
version: '3'

services:
  database:
    # this time we do not use the build command
    # we use the image command to use an existing image
    # by default, docker compose will look at the local registry
    # to find the image
    # if it is not locally available, it will pull it from
    # the docker hub registry
    image: postgres:16.1
    ports:
      # the ports that we want to publish
      # the first port is the port on the host system
      # the second port is the port inside the container
      # so we map the port 3000 of the container to the
      # port 3000 of the host
      - "5432:5432"
    # we can define and pass environment variables
    # to the container
    # we will use these variables to connect to the database
    # in our server
    environment:
      POSTGRES_PASSWORD: password
      POSTGRES_USER: user
      POSTGRES_DB: database
      # if you use a .env file
      # you can use ${YOUR_ENV_VAR}
      # and Docker will replace this value
      # with the value in your .env file
      YOUR_ENV_VAR: ${YOUR_ENV_VAR}
    # you can also pass complete .env files
    # even multiples
    env_file:
      - .env.local
      - .env.override
      # env files are structured like
      # `YOUR_ENV_VAR=your-env-value`
      # each line is a new environment variable
How Do You Restart A Service When It Has Crashed In Docker Compose?
Computers, applications, power supply, humans can fail. So it goes without saying that a docker container can fail as well. If we want to restart our service when it stops, we can use the restart option within the service object.
version: '3'

services:
  client:
    build:
      context: .
      dockerfile: Dockerfile.client
    ports:
      - "80:80"
    # whenever our container stops, we want it to restart
    # unless explicitly stopped manually by us
    restart: always
How Do You Wait For Another Service In Docker Compose?
Every so often, you have dependencies between services. For example, your backend container needs to wait until the database container is started. To wait for another service, you can specify the service name in the depends_on option.
version: '3'

services:
  server:
    build:
      context: .
      dockerfile: Dockerfile
    ports:
      - "3000:3000"
    restart: always
    # we want our server to wait for the database to be ready
    # docker compose only checks if the container is running
    # not if the database is ready
    depends_on:
      - database
How Do You Wait For Another Service Based On A Condition In Docker Compose?
Docker Compose does only wait until the service in your container is ready. If you do not specify a condition, Docker Compose can only wait until the container has started. It does not actually wait until the database is ready. To wait for the database to be ready, we can add a health check to our database service and add a condition to our depends_on options. In our depends_on object we can add a key that is named after the service (in our case database) and in this, we can add a key called condition and set its value to service_healthy. In that way, this container will wait for its start until the database’s healthcheck was successful. You will learn how to add a health check in the next section of this article.
version: '3'

services:
  server:
    build:
      context: .
      dockerfile: Dockerfile
    ports:
      - "3000:3000"
    restart: always
    # we want our server to wait for the database to be ready
    depends_on:
      # here we specify the name of the service
      # in our case, our service is named database
      database:
        # we add a condition
	      # only if this condition is met
	      # the server service will start
	      condition: service_healthy
How Do You Define Health Checks In Docker Compose?
You can define a healthcheck for your services. These health checks determine whether a service is healthy or not. A healthcheck object consists of multiple options.
- test: This key holds the command that should be executed to determine if the service is healthy
- interval: The interval in which the
healthcheckshould be executed - timeout: If a single run of a health check takes longer than this specified period, the check is considered to be failed
- start_period: Gives the container a time to bootstrap. When a health check fails during this period, it does not count as failure. But if it succeeds, it will set the status of the service to healthy.
- retries: How often should we retry before we set the status of a service to unhealthy.
services:
  database:
    image: postgres:16.1
    ports:
      - "5432:5432"
    environment:
      POSTGRES_PASSWORD: password
      POSTGRES_USER: user
      POSTGRES_DB: database
    restart: always
    # in Docker Compose, we can define health checks
    # health checks are commands that are executed
    # to check whether the container is healthy or not
    healthcheck:
      # in this case, we check if the database is ready
      # by using the pg_isready command
      test: ["CMD", "pg_isready", "-U", "user", "-d", "database"]
      # we check if the database is ready every 2 seconds
      interval: 2s
      # when a duration of a check takes more than 2 seconds
      # we consider it a failure
      timeout: 2s
      # we retry 3 times before we set the status to unhealthy
      retries: 3
      # we give the container 2 seconds for bootstrapping
      # before we consider a failed health check
      start_period: 2s
How Do You Persist Data With Volumes In Docker Compose?
If we started all of these containers, write data into the database and then stop and remove those containers, all data from the database would be removed as well. To persist data throughout container starts, we need to utilize volumes.
We can use named volumes. These are volumes where you specify a unique variable name for a volume and the path inside the container. In this way, docker will handle the location on the host system. The path inside the container is the part of the container’s file system that you want to persist.
volumes:
  - name_of_volume:/path/inside/of/container
A mounted volume works similar, but the first part is an absolute path on the host system. In that case, Docker is not handling the location of the volume, but we are selecting a location on the host system our self.
volumes:
  - /path/on/host/system:/path/inside/of/container
In our case, we use a named volume and the location where Postgres stores the data.
database:
  image: postgres:16.1
  ports:
    - "5432:5432"
  environment:
    POSTGRES_PASSWORD: password
    POSTGRES_USER: user
    POSTGRES_DB: database
  restart: always
  healthcheck:
    test: ["CMD", "pg_isready", "-U", "user", "-d", "database"]
    interval: 2s
    timeout: 2s
    retries: 3
    start_period: 2s
  # we want to persist the data of the database
  # so we use a volume
  # the volume is defined at the bottom of this file
  # we use a named volume
  # the name is postgres_data_volume
  # and we mount the path /var/lib/postgresql/data
  # from the container to the volume
  # when we create a named volume, docker will create
  # a directory on the host system to store the data
  # this is managed by docker
  # it follows the same rules as the port mapping
  # the first path (or name) is the path to the host system
  # the second path is the path inside the container
  volumes:
    - postgres_data_volume:/var/lib/postgresql/data

# here we define the volumes that we use
# if we want that a service uses a volume
# we need to explicitly use it in the service
volumes:
  # we create a named volume called
  # postgres_data_volume
  postgres_data_volume:
    # if we do not specify anything here
    # docker will use the default settings for this volume
How Do You Communicate With Other Services Via Networks In Docker Compose?
To let containers communicate with each other, we use networks in Docker. Docker Compose creates a default network for all your containers in a compose.yml. To illustrate how you can manage your networks, we define on network ourselves. This network will connect the server service with the database service. Docker will create DNS entries for each service in this network. This allows us to call the other service with its service name that we have defined in our compose.yml. In our case, we can make a call to the database service by using database as the hostname for our database in our code. We could make an HTTP request to the server service by calling curl -X GET http://server:3000/ inside our database container.
version: '3'

services:

  client:
    build:
      context: .
      dockerfile: Dockerfile.client
    ports:
      - "80:80"
    restart: always

  server:
    build:
      context: .
      dockerfile: Dockerfile
    ports:
      - "3000:3000"
    restart: always
    # docker compose uses a default network if we do not specify one
    # but for this example we created our own network
    # that connects our database and our server
    # the definition of the network is at the bottom of this file
    networks:
      - server_database
    depends_on:
      database:
        condition: service_healthy

  database:
    image: postgres:16.1
    ports:
      - "5432:5432"
    environment:
      POSTGRES_PASSWORD: password
      POSTGRES_USER: user
      POSTGRES_DB: database
    restart: always
    healthcheck:
      test: ["CMD", "pg_isready", "-U", "user", "-d", "database"]
      interval: 2s
      timeout: 2s
      retries: 3
      start_period: 2s
    volumes:
      - postgres_data_volume:/var/lib/postgresql/data
    # docker compose uses a default network if we do not specify one
    # but for this example we created our own network
    # that connects our database and our server
    # the definition of the network is at the bottom of this file
    networks:
      - server_database

volumes:
  postgres_data_volume:

# here we define the networks that we use
# if we want that a service uses a network
# we need to explicitly use it in the service
networks:
  # we create a network called
  # server_database
  server_database:
    # if we do not specify anything here
    # docker will use the default settings for this network
How Do You Start Multiple Services With Docker Compose?
Now to start all containers defined in a compose.yaml you need just one command. If your container depends_on another container, Docker will start all containers required for this service.
# make sure to be in the directory where the compose.yaml is located
$ cd /path/to/project/root
# start all containers
$ docker compose up
# if you want to start all containers in a background process
# add the flag --detach
$ docker compose up --detach

# use this for the following section as well
# verify all containers
# by listing all containers running on this system
$ docker container ls
# verify the volume
# by listing all volumes on this system
$ docker volume ls
# verify the network
# by listing all networks on this system
$ docker network ls
How Do You Start A Single Service With Docker Compose?
You can also start single services by specifying them via their service name. If you want to start only the database, you could do so with the following command.
# make sure to be in the directory where the compose.yaml is located
$ cd /path/to/project/root
# start the database container
# docker compose up <service-name>
$ docker compose up database
# add the --detach flag to start it as a background process
$ docker compose server --detach
# this command will start the server and the database
# because the server depends on the database
How Do You Stop And Restart Multiple Services With Docker Compose?
If you want to stop all containers at the same time, you can do so by executing one command. This command will not remove those containers, so you would be able to restart them.
# make sure to be in the directory where the compose.yaml is located
$ cd /path/to/project/root
# stop all containers
$ docker compose stop
# if you want to restart it
$ docker compose restart
How Do You Stop And Restart a Single Service With Docker Compose?
You can also stop a single service with Docker Compose by specifying the service name.
# make sure to be in the directory where the compose.yaml is located
$ cd /path/to/project/root
# stop the database container
# docker compose stop <service-name>
$ docker compose stop database
# if you want to restart it
$ docker compose restart database
How Do You Remove Multiple Services With Docker Compose?
To remove all stopped containers, you can execute the following command.
# make sure to be in the directory where the compose.yaml is located
$ cd /path/to/project/root
# remove all stopped containers
$ docker compose rm
# this will ask you if you are sure about this action
# if you would like to remove them, confirm this action by typing
# "Y" in your terminal
How Do You Remove A Single Service With Docker Compose?
You can also remove a single stopped service with Docker Compose by specifying the service name.
# make sure to be in the directory where the compose.yaml is located
$ cd /path/to/project/root
# remove the database container
# the container needs to be stopped before you can remove it
# docker compose stop <service-name>
$ docker compose stop database
$ docker compose rm database
How Do You Stop And Remove Multiple Services with Docker Compose?
To stop and remove all containers from a compose.yaml at the same time, use the following command.
# make sure to be in the directory where the compose.yaml is located
$ cd /path/to/project/root
# stop and remove all containers
$ docker compose down
How Do You Access Services Started With Docker Compose?
You can use docker exec -it <service-name> <command>. If you want to understand the previous command in more detail, read my previous article about the Docker basics.
In compose you can use the same command but with the service name.
# make sure to be in the directory where the compose.yaml is located
$ cd /path/to/project/root
# create an ssh like session with a service
# docker compose exec --interactive --tty <service-name> sh
$ docker compose exec --interactive --tty database sh
# now you are inside the container
# use exit to close the connection
$ exit
How Do You Access Container Logs in Docker Compose?
To access container logs, you can use the following command.
# make sure to be in the directory where the compose.yaml is located
$ cd /path/to/project/root
# to access all container logs
$ docker compose logs
How Do You Access Container Logs Of One Specific Service In Docker Compose?
To access the logs of a single service, you can specify the service name.
# make sure to be in the directory where the compose.yaml is located
$ cd /path/to/project/root
# to access the logs of the server
# docker container logs <service-name>
$ docker compose logs server
Conclusion
In this article, we learned the difference between Docker and Docker Compose. You can now write your own compose.yaml to manage multiple containers at once. Furthermore, you know how to persist data with volumes, how to communicate via networks and how to access the container or the logs from the host system.
If you need help with your containerization, feel free to contact us, or join our new community for further questions and discussions (free cookies for the first 42 arrivals and only 6 left 😱)!
Join Our CommunityYou liked this article? Share it with your colleagues and friends.
Sign up for our newsletter!
Do not miss out on our latest tips, guides, and updates – sign up for our newsletter now! We promise to only send you the most relevant and useful information. Be part of our journey in exploring the world of Docker and beyond.
By clicking subscribe, you agree to the privacy policy. You can unsubscribe at any time by clicking the link in the footer of our emails.